> ## Documentation Index
> Fetch the complete documentation index at: https://kb.micro1.ai/llms.txt
> Use this file to discover all available pages before exploring further.
# Personalize interview invitation email
> Personalizing the invite email is one of the easiest ways to boost invite → completed conversion. With dynamic tags, you can automatically pull key details (role, duration, skills, etc.) into the email so every candidate gets a message that actually feels meant for them.
## What are dynamic tags?
Dynamic tags are placeholders like`{{role_name}}`that get replaced with real values when the email is sent.
Example:`You applied for {{role_name}}` → `You applied for Backend Engineer`
### Available dynamic tags
You can use these tags in your invitation email content:
* `{{application_link}}`
* `{{role_name}}`
* `{{interview_duration}}`
* `{{interview_type}}`
* `{{skill_list}}`
* `{{company_name}}`
Tip: Use the “+ Add dynamic tag” button in the editor to insert the correct format automatically.
## Why this helps (real benefits)
* **Higher conversion:** Candidates are more likely to start when they clearly see *what it is* and *how long it takes*.
* **Fewer questions:** Duration + interview type + skill list reduces “what am I walking into?” anxiety.
* **Less manual work:** No need to rewrite emails per role.
## Step-by-step: Edit and personalize the invitation email
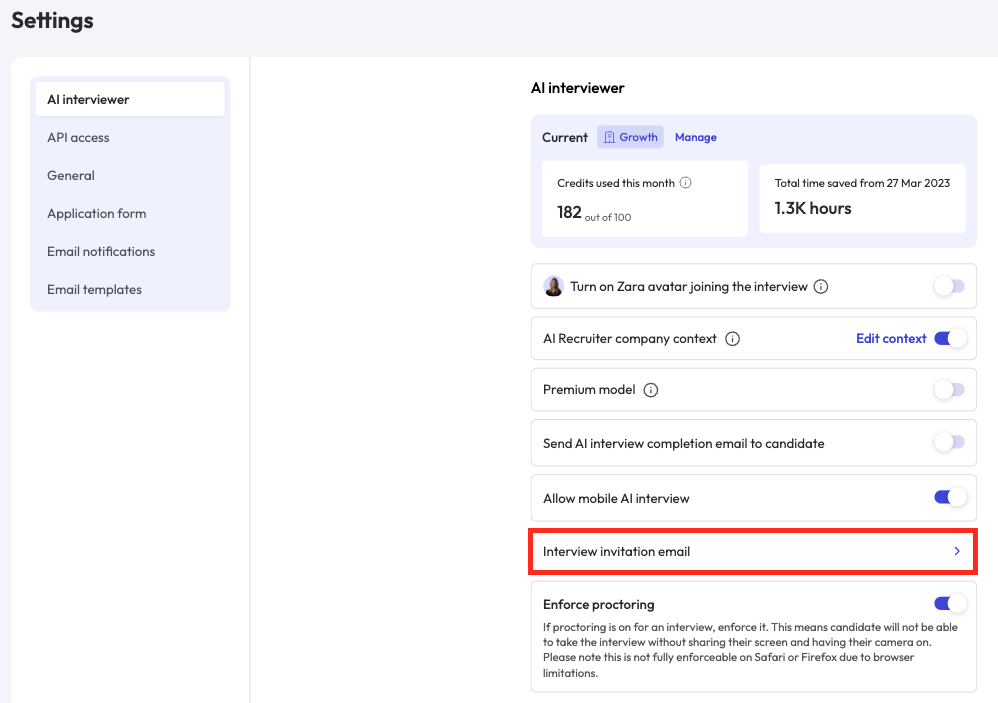
### 1) Open the invitation email editor
1. Go to **Settings**
2. Open **Interview invitation email**
3. You’ll see an editor with your email content and formatting options.
 ### 2) Add dynamic tags inside the email body
1. Place your cursor where you want to insert a value\
Example: after “applying for…”
2. Click **+ Add dynamic tag** (top-right of the editor)
3. Choose the tag you want (it will insert at your cursor)
Recommended placements:
* Role:`{{role_name}}`near the start
* Duration:`{{interview_duration}}`near “What to expect”
* Skills:`{{skill_list}}`as a short bullet list or line item
* Interview type:`{{interview_type}}`near prep instructions
* Company:`{{company_name}}`in greeting + sign-off
### 3) Keep the CTA clean
Your email already includes the CTA button (example: **“Take AI interview”**).\
Avoid pasting`{{application_link}}`randomly in the middle, unless you *want* a backup link.
Best practice:
* Keep CTA button as the main action
* Add a fallback line at the end like:\
“If the button doesn’t work, use this link: application\_link”
### 4) Review the email for readability
Before saving:
* Keep it short: candidates scan, they don’t read novels (sad but true)
* Put key info above the fold:
* Role
* Duration
* Skills
* Make prep notes skimmable (bullets > paragraphs)
### 5) Save the template (don’t skip this)
Once you’re done editing:
1. Scroll to the end
2. Click **Save** **Changes**
3. You’re set. New invites will use the updated template.
## Suggested invite email structure (copy-ready)
You can use this layout and customize the tone:
Thank you for your interest in company\_name and applying for role\_name.
We’d like to invite you to complete an interview with Zara.
* Estimated time:`{{interview_duration}}`
* Interview type:`{{interview_type}}`
* Skills covered:`{{skill_list}}`
Quick prep notes
* Use stable internet
* Sit in a quiet place
* Don’t close the browser during the interview
* Make sure to share screen and camera permissions if asked
> You can also check out our [AI Interview Guide](https://www.micro1.ai/ai-interview-guide) if you’d like to feel more comfortable before starting.
We’re excited to hear your responses.
**Best regards,**
`{{company_name}}`**Team**
### 2) Add dynamic tags inside the email body
1. Place your cursor where you want to insert a value\
Example: after “applying for…”
2. Click **+ Add dynamic tag** (top-right of the editor)
3. Choose the tag you want (it will insert at your cursor)
Recommended placements:
* Role:`{{role_name}}`near the start
* Duration:`{{interview_duration}}`near “What to expect”
* Skills:`{{skill_list}}`as a short bullet list or line item
* Interview type:`{{interview_type}}`near prep instructions
* Company:`{{company_name}}`in greeting + sign-off
### 3) Keep the CTA clean
Your email already includes the CTA button (example: **“Take AI interview”**).\
Avoid pasting`{{application_link}}`randomly in the middle, unless you *want* a backup link.
Best practice:
* Keep CTA button as the main action
* Add a fallback line at the end like:\
“If the button doesn’t work, use this link: application\_link”
### 4) Review the email for readability
Before saving:
* Keep it short: candidates scan, they don’t read novels (sad but true)
* Put key info above the fold:
* Role
* Duration
* Skills
* Make prep notes skimmable (bullets > paragraphs)
### 5) Save the template (don’t skip this)
Once you’re done editing:
1. Scroll to the end
2. Click **Save** **Changes**
3. You’re set. New invites will use the updated template.
## Suggested invite email structure (copy-ready)
You can use this layout and customize the tone:
Thank you for your interest in company\_name and applying for role\_name.
We’d like to invite you to complete an interview with Zara.
* Estimated time:`{{interview_duration}}`
* Interview type:`{{interview_type}}`
* Skills covered:`{{skill_list}}`
Quick prep notes
* Use stable internet
* Sit in a quiet place
* Don’t close the browser during the interview
* Make sure to share screen and camera permissions if asked
> You can also check out our [AI Interview Guide](https://www.micro1.ai/ai-interview-guide) if you’d like to feel more comfortable before starting.
We’re excited to hear your responses.
**Best regards,**
`{{company_name}}`**Team**